Tampilkan postingan dengan label Updo's. Tampilkan semua postingan

Selasa, 06 Juli 2010

Fabulous, Step by Step

Just in case anyone missed it, there is a GIVEAWAY in the post about Alex's recital. http://tinydiva.blogspot.com/2010/07/be-my-little-baby-bumblebee.html
A pair of hairbows available to one lucky winner, so comment away! ;)

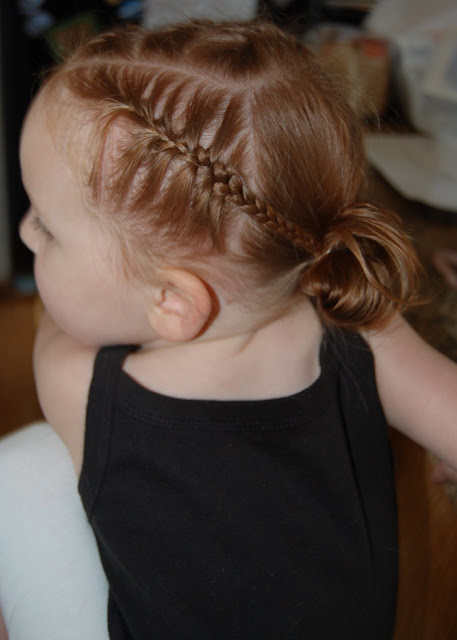
And now for the 'do that I did for Alexandra's Faboulous photos... The up close, step by step pics I took of this hairstyle...
I started, as usual, by separating two sections in front and holding them back. I put the bottom into a low side ponytail. (Oh, and please ignore the sand... we have it under their playground/fort and it's always in her hair!)
Next, I parted the front into smaller sections and started some french braids. I put three on one side and just one on the other.
I pulled everything together into a messy bun type thing. I had to use one bobby pin for that last braid that wouldn't quite stay. Then some hairspray because her hair was frizzed out!
Add a bow and some sass and there you have it! ;)

Sabtu, 26 Juni 2010

I want FABULOUS! Give me Fabulous!

Alex loves HSM and that song is her favorite. That's how she decided to describe this set when she first tried it on! ;) It is definitely over-the-top... and I just LOVE it! ;)
This is an all new outfit from the Fairie*Kisses Couture Line. (For those who don't know, that's me.;) I have made tutus and bows for quite a while and I've done some simple skirts and tops. But this project was a major feat! ;) I love all the steampunk stuff that I've seen on Etsy and other places, so I just had to try my hand at it! This was a blast to make and Alex just fell in love with it! ;)

Ruffles always make things better! Alex insists on them every time I start a new project!
Lace is great too, so girly! And then, of course I had to make a mtaching hairbow.
We had to do a special hair-do for the pictures too... I parted out the sections I wanted and held each aside with a ponytail. I put a french braid in each section then pulled all the ends and the rest of the hair together in a low side-tail. I made a messy bun then topped it off with her new bow. Voila! ;)
I like how the whole thing turned out! It looked adorable on Alex and she felt simply "Faboolus"! ;)

Rabu, 21 Oktober 2009

Mixed up braids & Three Little Piggies

Alex asked me for something really fancy today, so I just took my time on this one. Actually, I had no clear idea of what I was doing until about half-way through. ;) Well, this is how it started...
I parted the top section of hair at a sharp angle and then parted the right half. I made a french braid from the middle and going out to the far right piggie. Then I took half of the hair from the right ponytail on the bottom row and added it to the far right middle piggie too.
I did basically the same thing on the left side except that I made a french twist braid this time.
Next I took the remaining loose section and did a regular braid, but I started it near the bottom. I crossed it over to the middle piggie.
I did this on the right too, but swapped it again and did a twist braid.
There are still two pieces of hair sticking out from the bottom ponies. I pulled these up to the middle piggie. Then I made messy buns. I added flower clips, but apparently didn't get pics of the finished 'do. Oops...
Still, it was adorable. And Alex loved it! ;)

Rabu, 14 Oktober 2009

Lovely Updo ~ A Poof & 2 French Braids

Finally a new style! ;)
This was inspired by a style I saw on a tv show...
It was pretty easy to do, but I did adapt it a little for short hair.
I started with a simple little poof on top. I used just a touch of mousse and did a small amount of teasing/back-combing in the middle of the top section. Then brush the top smooth and add an elastic about an inch away from the head. Then pull on just the bottom part of the hair in the elastic to tighten it. This puffs up the hair a little better.
And really, you could stop there, it is cute enough. ;) Anyway, I did french braids in the remaining hair, one on each side. And I sort of braided toward the middle by taking more hair from the outside than the inside. Although I used all the hair, I put the elastic in above her hairline.
After both braids are finished, put use another elastic to hold the ends together. For short hair, this seems to be the best way to go. I twisted the pieces in and up before putting them together, but you could also do a pull-through knot. --- For longer hair, you have several options. You could just pull all the hair into a low ponytail, or do a bun. You could curl the ends or do a messy bun. It would also be cute to do the braids straight down, then split the top section in half and add it to the braids. Just a few ideas. ;) ---
Okay, so this step is difficult to explain, and obviously I'm not really that good at it anyway. ;) I took the hair in that top section and pulled it to the side turning the end up. I added the end to the ends from the braids and used an elastic to hold them together. Then just move the section back in front and mess with it 'til it looks right. Lol, yeah great instructions, huh? ;)
And to hide all those hairs I had sticking out... a flower clip! ;)
If you wanted to hide the top elastic, you could do a wrap around with the hair or use a smaller clip, I was pleased with the finished 'do and Alex loved it too. ;)

I actually think this style is kind of fancy and would look really pretty for a dance. ;)

Sabtu, 08 Agustus 2009

An updo for short hair

I have been wanting to try this style on top, but just kept forgetting when I was actually fixing her hair. Anyway, I think this is a pretty 'do that could be worn for a wedding if you just curl the ends.
To start, I parted the hair far to one side in a sweeping sort of curvy motion(yes, I just said that;). Next I parted out each twist braid section in the same manner, holding each back with an elastic. French braids or twist braids, or even pony braids will work for this style.
I one section at a time and continued with a normal braid/twist braid when I had reached the end of the section, then secured the end with an elastic. After I had the braids finished on both sides, I gathered them all up into an elastic. Then, I was able to remove the elastics from the ends of each braid and fan out the remaining hair.
For the back, I just pulled up the hair that didn't fit up to into a ponytail and did a pull-through going up. You could do a messy bun, curls, tease, whatever to give the hair a little oomph so that the two bits blend together.
Alex still had a little that wouldn't go up, but I think it was cute and would have looked pretty with a quick curl;)
I added flowers to top off the look and was pretty happy with it. Alex was excited to have her hair "up, puddy" again;)

Before I go, I want to say thank you to everyone who responded to my last post with comments and emails. I really appreciate your feedback (both positive and honest criticism alike!) I really enjoyed making her outfit and would love to sell custom sets in the future, so your ideas and suggestions are always welcome. As always, I am honored that you have visited my blog! Thank you;)

Jumat, 05 Juni 2009

2 French Twist Braids + a Pony

This is a great style! You can make this very dressy or just fun. I chose this because we were having an all day graduation party/mini family reunion. The kids hopped in the pool around noon and stayed in until dark, except for two short breaks to eat:)
Part the hair however you want.
Not sure you can tell, but I pull back the bangs and some hair behind them leaving a little piece in the middle sticking out in front.
I put an elastic around the bangs+ section. Then I use that little piece I left out to tie a knot around, hiding the elastic. This seems to work best for me, but some use a piece from the pony...
This part is hard to explain, but it really is simple! My camera doesn't do video, sorry:) Split the hair in front into two sections, cross them over each other once. Add the next section of hair(as shown in the picture) to the bottom piece, then cross them again the same direction. I just grab some hair, I want something sort of relaxed, but you could use a comb for the sections. You continue adding the next section of hair to the bottom piece and cross them. These sections should be from the top of the part all the way to the bottom of what you want braided...
When I get to the back/crown of her head, I stop and add an elastic.
You can just leave it like this and cover with a bow or flower. This time, I added the two pieces together in a pony and did a pull-through. I had straightened her hair the day before, so it was sticking out everywhere:)
I added flowers, and voila! Okay, so it was early in the morning and she fell asleep:) Kinda glad I still have her little booster seat:)
It looked really pretty half down, but for the pool I wanted it all up!
I just took the flowers out and put all of her hair that was down into a messy ponytail. It was adorable and stayed for the rest of the day!
Her hair got soaked, then dried, then back in the water... still stayed up...
Even when she could hardly stay up:)

Rabu, 27 Mei 2009

Super-Easy-No-Pins-Stay-All-Day Updo

Here is one of the styles that I gave a peek of earlier this week. It is an awesome updo! You can make this dressy or fun, whatever you are going for:) I love this do and fix my own hair this way occasionally. My favorite things about this one? NO pins and it won't fall out!
Okay, so you have seen this first pic. I did it a different way for the tutorial pictures. This time, I put all the hair up, including her bangs. I like it both ways, but I think the bangs being down is a little better for my baby girl... Well, at least for everyday wear:)
So, to start, you want to part out the front hair and whatever tendrils you want hanging. And of course, the bottom if you are only doing half. Put the rest into a ponytail.
Next, I used a pony to hold her bangs back. This isn't the best picture and I actually re-did this, but didn't get another pic. Anyway, I just put the bangs in an elastic with some hair in the middle toward the bottom of the section. Then, twist the sections back and add them to the pony.
Do a pull-through up.
Another lousy pic, sorry:) Put an elastic at the end of the remaining hair; I fold over the ends the last time around, just to make it easier.
Now, just push the elastic and end of the hair up into the pull-through. This time, to make it a little fun, I pulled the ends out and spiked them a little.
So that's it! I used 4 elastics and this stayed all day!