Tampilkan postingan dengan label Ballerina Bun. Tampilkan semua postingan

Minggu, 18 Juli 2010

Gymnast Bun; Lauren's from Make It or Break It

I've noticed that some of my fellow bloggers have lsited some of Lauren's hairstyles from the show Make It or Break It. She is a mean girl from what I've read, but she has great hair! I don't actually watch the show, but it pops up on Hulu's home page all the time. ;) Well my model for today is an incredibly nice girl. Really, my niece is the sweetest and most well-behaved child I've ever met! ;) And here is her 'do...
We started by pulling all the hair into a ponytail, minus the front from one ear to the other.
I made a deep side part and put the smaller side into a braid and then aaded it to the ponytail.
On the other side I did a one sided french braid. These are easier than they sound. ;) You just start with your 3 pieces and braid them over each other. But when you add hair, you only add to the front section and you braid the others as though it were a regular braid. Hope that makes sense... It gives a nice poof to the front and an "edge" to the back. This will be more defined on girls with thicker hair.
It really looked pretty and stayed up out of her face all day.
Isn't she just squeezable?! ;)

Jumat, 10 April 2009

Criss-cross twists into a bun. Another Easter do.

Okay, this isn't really my style, so for directions go to The Story of A Princess... http://hair4myprincess.blogspot.com/2009/03/easter-dress-and-fancy-easter-hair.html
I love the style and wanted to do this for Easter. However, my baby girl doesn't have quite enough hair, or maybe not a big enough head yet:) It is still super cute and I will do it again!
The only thing I did differently was the sections at the front. I was trying to go for a softer look, so instead of using elastics for each section, I parted and crossed them. Hope that makes sense:)
We had class for big brother, piano lessons, and church that day... she got compliments everywhere!
I think this is one that you can dress up or down. It is perfect for warm weather!
Doesn't she look comforatble? Lol, I think she would have fallen asleep if I'd let her:)

Jumat, 03 April 2009

A perfect Ballerina Bun

Well, this blog features mega-crazy fly aways and a super easy, super cute way to make a bun(yours does not have to have fly aways)... But, as promised, here it is (hey, it's still Friday!)
So, just ignore all those wisps from the Kansas wind and try to see the style:) Alex wanted to be outside and I was just taking these to show how I make my bun stay againts her head, so I hope it doesn't drive you too crazy!
Do you remember that first ponytail on top of baby's head? It made the hair look like a little fountain, so adorable! Well, that "fountain" is exactly what you're going for here. Okay, terrible pic... sorry! Hopefully you get the idea, just grab all the hair in the fountain with your fingers, you want it to stay in a circle.


Then put an elastic around it... and there you have it!... Okay, so there are a few more steps.

Using the comb instead of just pulling the hair out with my fingers, gets an even amount all the way around.


It looks a little funny at this point, but it turns out so super cute!
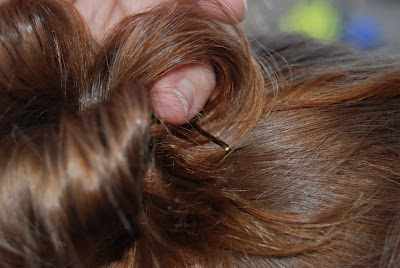

Use your finger to hold the hair against the head, then pin it down. This may look like a typical bun, but because of the pony, the hair is already in place, it just needs to be held down.


I did the boof a little different this time. I just stick my rat tail comb in the hair straight across, then pushing up gently, move it front to back, keeping it level. You can do just the top layer for less poof. You want to do the hair at the front last for a smooth look. Add hairspray to hold.


Can you see that little boof on top, I love that:)
Yeah, you know, just ignore it... I know it is making you insane, but hair will not be tamed in this wind:) Most days I would do this with slightly damp hair and a little gel or polmade, then finish the whole thing with hairspray... oh, and maybe do it inside!


I didn't worry about the little pieces sticking out, actually I left them on purpose this time. You can tuck them in. If your little one has longer hair you can let the rest of the hair fall, put curls in it, or wrap it around the outside. This probably wouldnt' work for those with very long hair.


I know, a billion pics here, but I wanted to show that you can get this smooth all the way around.


And my favorite part, that adorable little girl!

Something for Easter

I just love how this turned out... so pretty! We did this for dance class yesterday, it stayed through class, naptime, and playtime!
I know this is a silly picture, but you get the idea of how I started. Alex has bangs, so I almost always put the front in a little pony to get them out of her face for dance.


I twisted that little section. You could combine it with the next pony or just pin it, we'll hide that later. I positioned this so it covered the part between the two bigger ponies.

I made a diagonal part starting right behind the little pony and then across and down the other side. The middle pony is on her crown and the bottom one I set to the right side.


Then I made a bun from each pony. I used a little hairspray to keep down the wispies a little. I had planned to show my directions in this post, but it will be in the next, promise! I know, that will make 4 for today...


I added a flower clip to either side and got the sweetest little style!